
- Time – Make sure you give yourself as much time as possible to build your shelter but not so much that you neglect other survival needs. We only had about an hour before we lost daylight. Remember if you are doing this for multiple days you can improve your shelter as time passes.
- Make sure you have a relatively flat surface to lay down (being on a hill side makes it tough to get comfortable and remain safe)
- Make sure that you cover as much surface area with branches and sticks
- Height – During warming temperatures you will want the roof of your shelter higher and leave open the sides to allow for air flow. In the colder periods you will want the roof lower and as much of the sides closed so that the dead air space will aide in trapping warmth. Note you will not want it so low that you can’t sit up (very uncomfortable) and if you have a fire this will increase your chances to pose a danger of drying out your shelter and it possibly catching fire. I wish I would have made the shelter a bit higher and more closed in on the sides.
- Bedding – You will want to pad the ground with as much as possible but prepare for some aches in the following days regardless.
- Fire – One of the most essential tools to survival. You will want this a reasonable distance from your shelter but not so much that it does not provide heat for you. I may have had the fire a little close to the shelter because some of the shelter materials started to dry out and blacken through out the night. I’m not going to complain too much because it kept me warm and I was never asleep very deep or for more than 45 minutes at a time. We did one thing right! When gathering fire wood make sure you get enough to last the night. You will not want to burn more than absolutely needed so that your supply lasts the night plus it makes tending the fire a lot easier and safer to maintain. If you’re relying on the fire for warmth you will not want to sleep for long periods, I mean you will but won’t have a hard time when you get cold or uncomfortable, because you will need the hot coals to build the fire back up when it dies down which also reminds me that you will need various types and sizes of fuel to include small sticks and twigs to thumb size pieces, dry leaves & grass.
- You will not want to skip the step of smoking out your shelter to remove insects and other creatures. Almost all living creatures have a natural disposition to fire. When we did this to the shelter a quarter size scorpion came out from the shelter and from under Mick.
Minimalist Survival Challenge 2016
At the beginning of 2016 Mr RedBeard is doing a Minimalist Survival Challenge. Here’s the gear load list so far. Be sure to communicate with us on Twitter @DaredtoSurvive. Feel free to give us suggestions, corrections, warnings etc.

Getting gear together for the survival challenge. What am I missing?
- Pack
- 2 Wool Blankets
- Sawyer Water Filter
- Morakniv Outdoor 2000 Knife
- A Winchester curved blade skinning knife
- Estwing Hatchet
- Head Lamp
- Ferro Rod
- Compass
- Wilderness identification guides
- State park ranger map with trails marked
- Rat trap
- Gloves
- First Aid kit
- Aluminum water bottle
- MSR Pot not pictured
How I fixed my Poweradd Solar Panel Portable Charger
Poweradd Apollo 7200mAh High Capacity Solar Panel Portable Charger
Solar type: Monocrystalline Solar Panel (highest efficiency rates)
Original Cost: $19.99 on Amazon
The other day I was very bummed to find out that my solar charging battery backup had failed and no longer charged via sun or either USB. I wrote the seller on Amazon from who I purchased the device with no answer. Considering the high failure rate I was seeing while trying to find a fix and the fact that it didn’t cost a whole lot I figured what the heck I’ll try to fix it because what’s the worst that could happen cause it’s already broken.
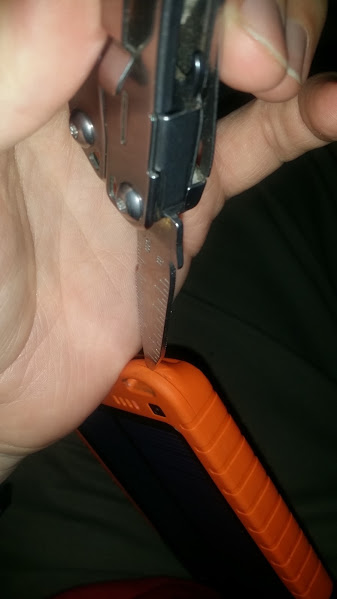
First problem disassembling
There are no screws so the case just snaps together? Turns out yes but there is an adhesive tab on top of the battery stuck to the back of the solar panel. Pay attention to the wires when taking apart. Loosen the case all the way around with a flat edge blade or screwdriver then pull apart at the bottom end first (opposite of USB ports).
Finding The Problem
What I think happened is that the lithium ion battery protection circuit got activated (lack of better term)? Maybe? So what I did was first check the voltage directly from the battery and got about 3vdc, then on the opposite side of the main protection circuit at about 3vdc. So the battery has a charge which means the battery didn’t fail.
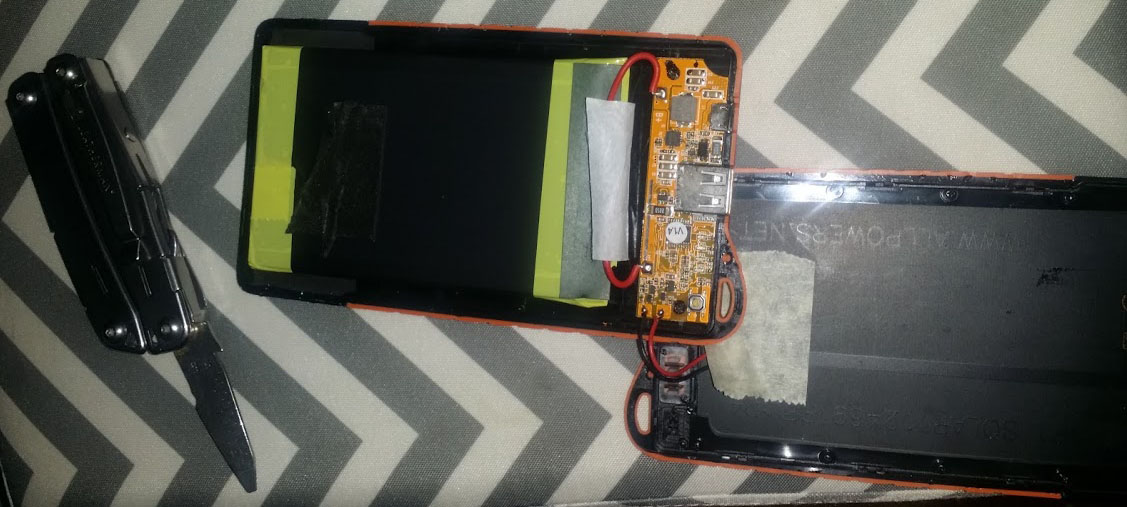
Battery is good and I have voltage so did a component fail?
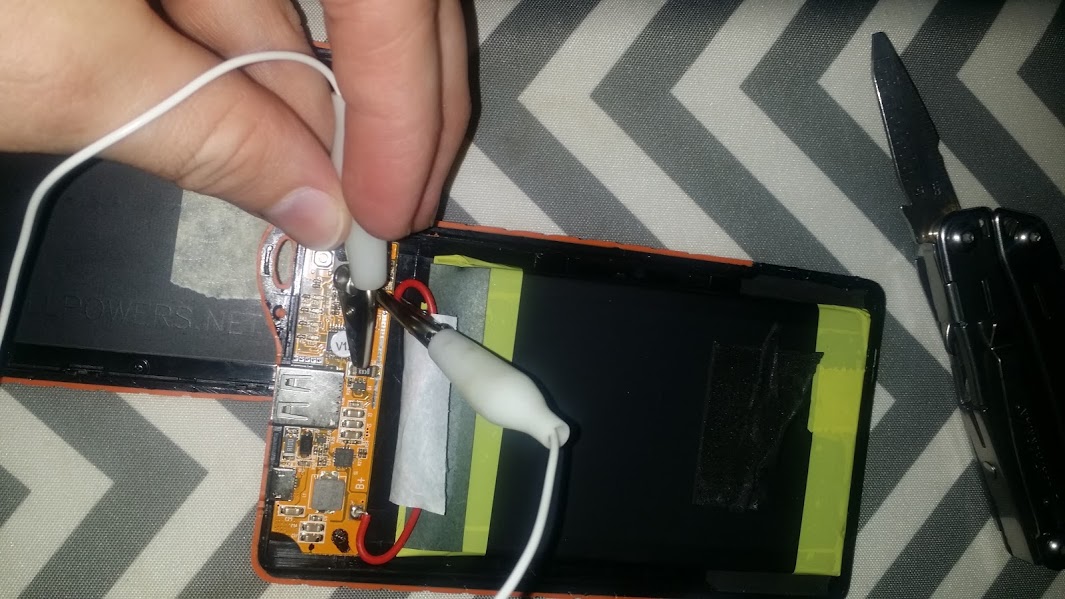
I decided to start bypassing voltage regulators and charging circuits using alligator clips to see if I could get the battery to turn on. In the end I hooked the voltage entering the circuit directly to the opposite side of this diode or resistor (I forgot to note it and the resolution sucks) then held down the power button. Viola I’ve got power!

You must be logged in to post a comment.