DIY DeadMau5 Head on a Budget

Here’s a brief run down on a DIY DeadMau5 head or helmet that I built with my son for Halloween.

Materials

Estimated Cost $33.48

Tools

Cut the half circles to give room for the neck. Magnets hold the spheres together. Put the half spheres together and mark evenly spaced marks around on both spheres to recess 2 sets of magnets total into each side. Don’t do like me and try and use E6000 cause it melts styrofoam, use hot glue just don’t let it get real hot.

Next for the mouth and ears. Use the paper DeadMau5 Mouth template, cut slits into the paper to get the templates to lay evenly and flat onto the surface of the sphere and tape it. Mark lines lightly with a pencil then cut using the hot knife in a well ventilated area. Be careful because the foam melts easy. Use the paper DeadMau5 Ear template to mark and cut the foam for the ears. Note that you will have to cut a curve into the base of the ears to get it to lay flush.

Now for the eyes. Take the 2 Dollar Store Touch Lights apart. You are wanting the dome that acts as a light diffuser. If you get lucky you might be able to use the leds. There will be lip around the outside edge of the dome that will need to be cut off and we used a hot knife for this.

Trace where the ears will be mounted on the sphere then cut/push a recess. Use black hot glue to fix the ears to the sphere. Paint the sphere and ears using acrylic paint. We applied 2 coats to get a good black color applied. Now take the domes you cut out and trace where you want the eyes. Cut/push in the outlines to better recess the domes. In the center of these eye traces you will want to make holes just smaller than the LED you acquired. Hot glue with black glue sticks the eyes. Make Xs on the eyes using electrical tape. Trace the mouth onto the fabric using the DeadMau5 Mouth template tracing slightly larger than the original. Using the black hot glue attach the fabric inside the mouth.

Now it’s time to wire up the LEDs for the eyes. This is pretty simple so I’m not going to post additional info unless asked. Amazon failed to deliver the Red El Wire on time for Halloween but we plan to add that soon. The Red El Wire will outline the ears and mouth.

DIY 100 Watt Bluetooth Speaker

There’s a trend of bluetooth speakers built into suitcases, ammo cans and other unconventional containers. These things sell for $300 or more which is quite a bit more than what it costs to build them. I will break down the parts, sources and their prices. This project was very easy and very affordable.

If you want a custom speaker built just contact us!

Parts

Total cost for one $38.87 (only used one of the speakers)

I found this train case on the side of the road. I stripped out the interior of the case and cleaned it up.


I used a template I found online for the Planet Audio TQ573 5×7 speaker to cut out the hole.

The amp is rated at 50 watts per channel and the speaker is rated at 100 watts. This build only uses one speaker so I bridged the amp to output 100 watts. This amp will run off 12vdc so a portable version would be an easy build.

Speaker mounted and working. It can get pretty loud and sounds great.


RedBeard’s Donnie Darko Mask

Favorite moment of the Donnie Darko mask

I’ve been wanting to make a Donnie Darko Frank the Bunny mask for some time now and finally got around to doing before this last Halloween. Disclaimer I’m no sculptor and have no experience with this. Definitely not perfect and I’m going to retry for something better later but I’ll share anyways.


This was a ton of fun to do but I think I might take some art classes at the AR Innovation Hub, a local maker space, soon.

Materials

I used a combination of paper mache and paper mache clay to make this mask. Paper mache clay is awesome!! I started with a styrofoam form and a blank plastic mask (that was too small).

Cara Brookins has a write up on paper mache clay. Cara is an author and super mom who I hope to interview after reading a few more of her books. I had the pleasure of meeting Cara a few years ago at River City Comic Con.

Errors

As you browse through the progress you’ll notice I started off with an uneven form and it never got better. I thought I’d fill in the lower jaw area to make the mask fill the outline of the printed mask but then removed it with haste. I also found out late that the paper mache clay needs to be kneaded and worked for a while before it becomes pliable. The mask ended up being a bit small but weighed a ton like hurt your neck ton.

I learned a lot from this project. I’m open to any tips you might have for the paper mache clay and sculpting in general.


Mask from the movie no comparison


Pictures from the build


Parsing Digital Sheet Music MXL Files – Stranger Things Theme Song on Arduino

Arduino Stranger ThingsI’ve been toying around with playing music using simple tones on the Arduino. I’m no composer or musician so looking around for sheet music I eventually stumbled across MXL files on a few sites like MuseScore.com. Below I have posted a sample of the Arduino playing the Stranger Things theme song.

MXL is a compressed XML file that contains the Sheet Music data, Credits, Parts, Voice Definitions, Notes, Tempo and Durations along with other information. Basically a universal format designed for composing music, project sharing and several additional applications.

Ok so MXL files, what I keyed in on was that the MXL file contained the Notes and their Durations. This is perfect because you can create a simple Arduino code to play notes if you have this information. Sorting through these files is very daunting and time consuming so I decided to create a simple app to parse this information to use it more easily.

This app was banged out pretty quickly so please forgive possible errors. Because some MXL files are compressed and others are not I built in the code necessary to unpackage the XML before parsing. The app allows me to separate the notes by voice with their durations. In addition I placed a numeric control that limits the amount of notes that get parsed. A screenshot example is on the left.

Huge thanks to Shvelo who’s Ruby code got me pointed in the right direction.

I have this project posted on GitHub where you can obtain the code for the app as well as the Arduino sample code.

You can download the compiled app from GitHub.

Arduino SetupPlaying the Stranger Things theme song on the Arduino was a bit tricky tweaking the tempo to make it sound right but way easier without having to manually extract the notes and durations. To the left is the simple Arduino setup using piezo from a walkie talkie wired to pin 8 and ground on the controller. Ignore the other wires because they’re not used here.

A thanks to Riley Apperson on MuseScore for his/her Composition of the Stranger Things Theme.

Follow up to yesterday’s Hurt My Brain – Is Gravity An Illusion?

GravityA follow up to yesterdays article “Oh Reddit how you hurt my brain” highlighting awesome physics talks on Reddit. This is a mind expanding nugget PBS Space Time that started out as a suggestion from Mick who never fails to deliver.

This is just a highlight and only one of the PBS Space Time videos on YouTube “Is Gravity An Illusion?” If you’re interested it would be a good idea to watch the entire series in order and some videos more than once. The videos build upon one another increasing the amount of knowledge you will have and understand.

Watch it and let us know what you think?


Oh Reddit how you hurt my brain

Gravity Well - http://dev.physicslab.org/Document.aspx?doctype=3&filename=UniversalGravitation_TotalEnergyOrbitingSatellites.xmlIt’s amazing how a simple question can open a pandora’s box. Mick shared this Reddit thread and I just had to share with you guys because this is exactly the kinds of conversations we have together on regular basis but mainly from the perspective that we want to know and are seeking answers.

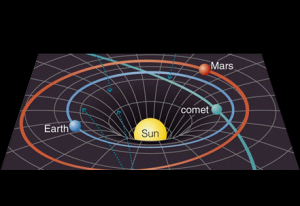
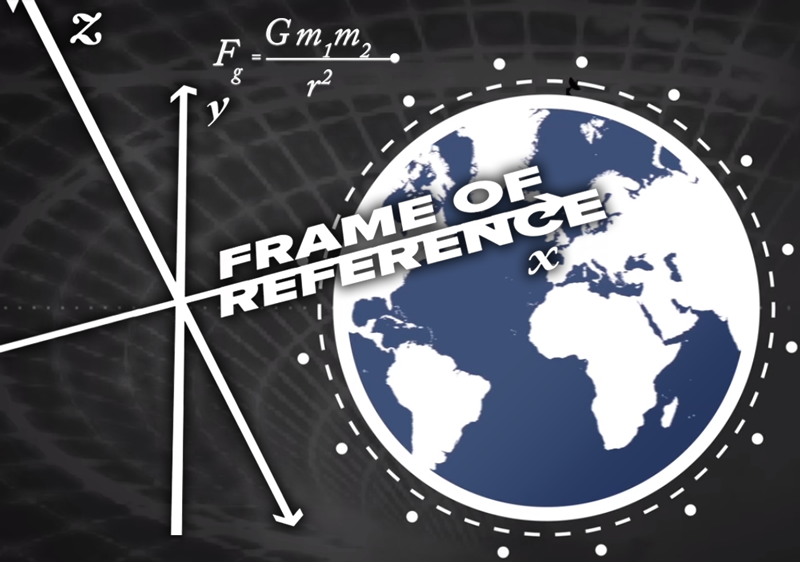
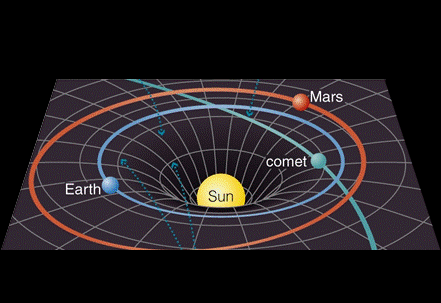
Is the earth pulled toward where the sun is now, or where the sun was 8 minutes ago?

A lot of questions are quickly given a simple answer only to followed by a more complicated and drawn out answers that only lead to more questions followed by more answers and only more questions until people I start to drool and fall over.

For example Hey Ash how did you get the Avocado Mustache? Then the answer would follow as Well you see….. Starting at the beginning giving background but that only leads to more questions and WTH’s. mickred.com/ash #AvocadoHalf

Answer

RobusEtCeleritas – Even though changes in the gravitational field propagate at finite speed (c), and it takes about 8 minutes for signals from the sun to reach Earth, the Earth accelerates toward where the sun is now rather than where it was 8 minutes ago.

Further explained

Totitiganiisuntgunoi – The slightly more exact answer is that the Earth accelerates towards where the Sun was 8 minutes ago extrapolated to where it would have moved based on its velocity and acceleration 8 minutes ago. The fact that the position is not quite the same as the “instantaneous position” (ignoring complications due to relativistic fu$%ery), is the very reason why the Earth-Sun system spits out gravitational waves.

And Bam! Another question

WiggleBooks – How is that possible? How is that information (velocity of the mass) encoded in the gravitational field?

See the internet is not pointless and full of hate…. But it gets deeper real quick. This guy has a grasp on the topic that I do not possess and yet it goes back a few times to re-explain and get his answer straight.

Erremermberderrnit – I don’t know how, but for relativity to work, it has to be that way. Because of relativity, even though the whole solar system is moving through the galaxy very quickly, all the parts behave as if the system were stationary. If the earth was attracted to where the sun was 8 minutes ago relative to its position in the galaxy, we’d be orbiting a point roughly 110,000km away from the center of the sun.
EDIT: Oh hey, I just thought of a good way to explain how it works, and it’s actually pretty simple. Just imagine a ball moving through space emitting pulses. The pulses are traveling outward from the ball, but they’re also moving in the same direction as the ball and at the same speed. If the ball suddenly stops moving, the pulses that were emitted when the ball was moving will still be traveling along at the same speed.
I guess when gravity waves are created, they inherit the velocity of the thing that created them.
EDIT2: I crossed out the last part because it occurred to me that, since light doesn’t carry the inertia of the body it comes from, then gravity waves probably don’t either. So I was trying to understand it, and I found something that seems like a paradox. Let’s say you have a ship moving through space and it emits two beams of light, beam A in the direction it’s traveling, and beam B in the opposite direction where it came from. If an observer on that ship measured how far the light had traveled after a certain amount of time, he would see that both beams had traveled the same distance. But, if you had a stationary observer, he would see that the ship is closer to beam A than beam B since it’s traveling toward A. So how can both of these scenarios coexist? What am I missing here?
EDIT3: OK, so thanks to some explanations, I understand this a little better now. Back to the metaphor with the ball, to the stationary observer, the pulses don’t travel along with the movement of the ball, they just travel directly outward from where they started. BUT, from the perspective of an observer on the ball, the pulses, as far as he can tell, ARE traveling along with the ball. If he were aware of the experiment going on and knew that he was moving relative to the stationary observer, and saw that the pulses stayed centered around the ball, he might conclude that the pulses inherit the balls velocity, even though it’s really an illusion.
So, if there were an object orbiting that ball, and you wanted make calculations about it, you would calculate as if the pulses were moving along with the ball, even though they aren’t, because from the ball’s frame of reference, they essentially are.
On a related note, I suppose that, even though we see the sun as it was eight minutes ago, it appears to us to be where it would have traveled to eight minutes later. So even though there’s a delay in the light, we still see it in its current location.
I think so anyway. If this is true, would the same thing apply to distant galaxies? If we look at a galaxy a billion light years away, we see it as it was a billion years ago, but does it also appear to be in the location it would have traveled after a billion years? Or does it appear to be where it was when the light was emitted? Would we have to be moving along at the same speed as that galaxy to notice any strange effects like that?

Holy crap that is a lot to take in. It was right about this point where I had to shake my head just to get another perspective. I’m feeling like I might have an insight then danggit

Invisibowl – Hm, so does the Doppler effect apply to gravitational waves?

This goes on and on for a while but isn’t even the entire thread. In fact another sub thread hits a real simple answer.

DouglasPR – In my understanding, the gravity connection between the sun and earth is not “pulsative”, like one sphere is “not there anymore” on the next pulse or cycle. To me its more like a string (a eight light minutes long string) connecting the two spheres, the bigger pulling the smaller around the galaxy. So earth is always being pulled towards where the sun is now, but the “string” is slightly “bent”, because its that long.

With further simplification

Wake_and_Poi – This is my understanding of it. It may take 8 minutes for information to travel along the tether, but it is still a tether.

I feel like this should be taught to everyone in the primary schools because I feel like I’m being taught something new every time I go down the road of (whatever flavor of) physics. To be honest these threads, PBS Space Time, Scott Manley and KSP are the equivalent of a college degree when you finally break through the threshold of understanding turn around and can explain this yourself.

Physics is amazing!

*Spelling corrections made in quotes

How a Nerd (RedBeard) Selects a new Wireless Router in 2016

RedBeard here. I have had some bad luck with wireless over the past 3-4 years. It seems like after owning a new router for about 6 months the 5GHz radio would start to go out all together or only work intermittently. Well it happened again with my NetGear R6200 and 2.4GHz is just not enough to go much longer without purchasing a new router. I usually take 3-4 months of mulling over various brands and trying to bring myself to spend the money. This time I and no one else in my family wanted to wait that long so I created a spreadsheet with some criteria I set to make the process go a bit faster (4hrs).

Side note I looked at the Google OnHub but after reviewing I found you have no custom options whatsoever other than some kind of device priority that appears to only sometimes work.

For research I used Amazon and manufacturers sites. Note review sites are very biased and don’t do much for me.

Wireless Router Criteria 2016

It came down to Asus, Linksys, Netgear and D-Link.

Criteria on the spreadsheet

  • * Price – I wanted to keep the price under $300
  • CPU Speed – Would have came into play if other criteria did not eliminate
  • CPU Cores – Would have came into play if other criteria did not eliminate
  • RAM – Would have came into play if other criteria did not eliminate
  • * OpenSource Y/N – I like having the option of running DD-WRT or OpenWRT. Why? Because I can further manage and regulate my setup, get further insights to hardware and can over/”under clock” the processor to either speed up everything or slow down to preserve hardware life. I could even find ways to monitor temperature of hardware and automatically reduce processing to to preserve life of router. In addition I can also mod the router to add fans or peltier cooling or add some new functionality.
  • * Number of Radio Bands – This is my number one criteria because it likely determines the number of radios. Basically I want 2 x 5GHz radios to separate traffic or as a back up if one radio fails. I didn’t find any routers with more than 3 bands at least not within my price range.
  • * Number of Antennas – The number of antennas should be the number of bands x 2 each for transmit and receive on each antenna. This allows for frequency isolation for better management. If less antennas than bands x 2 then most likely the antennas are shared which means some kind of fast switching on the radio or frequency isolation and I want to avoid that.

* marks my most important criteria

Eliminated from spreadsheet if they did not meet the following criteria

  • Reviews 4+ Stars
  • Searched to make sure routers did not have 5GHz radio issues
  • Eliminated those that use WIFI adapters not currently available
  • I wanted too keep my purchase below $300

What did I Choose and Why

D-Link AC3200 DIR-890LI chose the D-Link AC3200 DIR-890L/R because it has good reviews, it was in my price range, is tri-band, has 6 antennas (2x the num of bands min) and you can run OpenSource like DD-WRT or OpenWRT. I’ll keep you posted on how good my selection was and if it holds up. I would love to be able to find a brand or even a series of routers that I could throw my support behind but I don’t know if that will ever happen.

Conclusion

If I could design and build my own wireless router I would because it seems most of these companies cut too many corners to keep the price low and try to make the devices too “easy” to use. I can! Oh and hey NetGear what if I don’t want to authenticate to a third party or manage my devices from the cloud because that’s why it’s networked…. to the internet.

So throughout the year I plan to do just that. I will be designing and building my own opensource wifi platform. When finished I will post a how to and details as to why I chose what I did.

Wildcrafting While Taking a Walk

WildCraftingHoning in my wildcrafting skills during a walk on Monday. Needed a breather and decided to get up from my desk and take a 5 mile walk. Below are some of my finds. I didn’t have my field guide so I was not able to identify some other plants and decided not to catalog them. In order we have Sassafras, Persimmons and Chanterelle mushrooms.

I currently have plans to create an app to make field notes easier with tools and references. If anyone has interest in this even if beta testing please let me know.

Creating Plasma in a Microwave

Plasma PreviewAfter speaking with John Cohn and hearing about this experiment I just had to try it. Video recording is rough but you’ll get the idea. Soon I will be ramping this up when I start my series of microwave oven experiments where we will build everything from a high voltage power supply to a smelter and maybe just maybe a Microwave Death Ray (ok maybe just a herf gun).

Don’t try this at home!

Click here to browse through posts written about my interests in Microwave Projects

Robotics Demonstration

I’ve been giving robotics demonstrations to an Interfaith Summer camp being held by the ITSSM Interfaith Center while sharing some love for the AR Innovation Hub. The Hub has been such a blast to volunteer for and interact with and in addition they are always willing to help.

I wanted a way to demonstrate and provide immersion for children to learn a little about robotics so I threw this together. It’s not pretty but it sure is effective. Upon request I’m willing to write up details on the components, wiring as well as share the code used.

In addition I also toted along the R2D2 trashcan that my daughter and I built. This was a huge hit but also caused a mess when the children used R2 to transport popcorn.

A simple push button interactive arduino setup


The R2D2 trashcan that I wrote about previously controlled via bluetooth and app on an android.


Top